
Microsoft Graph Integration
IntegrationMicrosoftAzureAD_ConstantlyEvolving
IntegrationIntroduction
You can integrate third-party systems with Service Manager in many ways. The method you select will depend on business requirements, architectural and security constraints as well as the characteristics specific to each third-party application or service.
This document describes an integration process that has already been implemented in a customer context.
To find out more about this integration (e.g. scripts to be used), please do not hesitate to contact your EasyVista contact, or your service provider and integrator.
Overview of the integration
Microsoft Graph is used to create a gateway for accessing all data available in Microsoft Cloud Services (Microsoft 365, Windows 10 and Enterprise Mobility + Security). This gateway is especially useful to access cloud data from an automatic workflow creation tool that does not provide a standard connector for data access.  See the Microsoft Bookings use case.
- You can create a gateway in Microsoft Graph via an Entra ID application created on the Azure portal.
- The Entra ID application uses the Microsoft Graph API to access emails, calendars, contacts, documents, etc. See List of all permissions available for the Microsoft Graph API.
- The data can then be read in an automatic workflow creation tool, such as Microsoft Power Automate (formerly known as Microsoft Flow).
This integration enables you to create a gateway in Microsoft Graph to use the Microsoft Bookings API. You can then enable the gateway in your automatic workflow creation tool.
Use cases of the Microsoft Graph API
Access Microsoft Bookings data via Microsoft Power Automate
- Issue: The Microsoft Bookings connector is not shipped in the standard MS Power Automate version.
- Solution
- First, create a Microsoft Graph gateway to access Microsoft Bookings data from MS Power Automate.
See Step-by-Step Integration Process.
- Second, perform a Microsoft Bookings integration via MS Power Automate that will:
- Create the MS Power Automate data feed for enabling the gateway using the Microsoft Bookings API.
- Access Microsoft Bookings data using the gateway.
- Plan and manage business customer appointments in MS Power Automate.
- First, create a Microsoft Graph gateway to access Microsoft Bookings data from MS Power Automate.
Access of the Technical Support Agent to the Microsoft email server
- Issue: The Technical Support Agent (TSA) must be able to connect to the Microsoft email server on a regular basis and automatically to retrieve emails of the IT Support inboxes.
- Solution
- Use the Microsoft Graph Mail API via an Entra ID application.
Step-by-Step Integration Process
Prerequisites
- You must have an Azure subscription. If this is not the case, you can create a free account, or you can buy an Azure Pay-As-You-Go subscription. See the procedure.
- You must have the relevant accounts and access rights to the services interfacing with the Azure portal.
Notes
- You should save the login information throughout the entire procedure. It will be required when enabling the gateway in your automatic workflow creation tool.
See Microsoft Bookings integration (via MS Power Automate) using MS Graph.
Register an Entra ID application on the Azure portal
RegisterApp_Procedure
Step 1: Access the Azure portal.
1. Log in to the Azure portal using your Azure account.
2. (optional) Select the relevant environment if you have multiple tenants.
Step 2: Register a new application on the Azure portal and retrieve the ID.
1. Search for the App registrations service in the list of Azure services or click the link below to access the service directly.
Microsoft Azure: App registrations
The list of Entra ID applications previously registered on the Azure portal will appear.
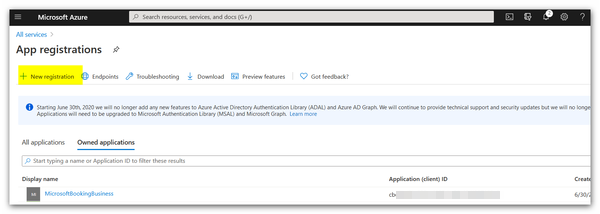
2. Click + New registration.
The properties window will appear.
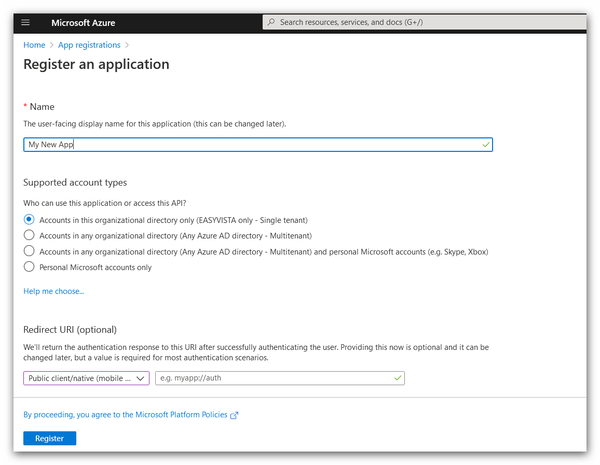
3. Specify the information required for registering the application.
- Name: Name of the application. Note: This name is not used by the third-party product.
 Enter a meaningful name that will enable you to identify the application easily in the dashboard on the Azure portal.
- Supported account types: Used to specify who can use the new application.
- Select the option called Accounts in this organizational directory only. This means that only accounts in your organization will be able to access the application (multitenant or single tenant).
- Redirect URI: Type of application and redirect URI where the Azure portal should send security tokens after authentication.
Note: For the Technical Support Agent (AST), select the type of application called Public client/Native.
4. Click Register.
- The Entra ID application will be created and registered on the Azure portal.
- Its IDs will be displayed.
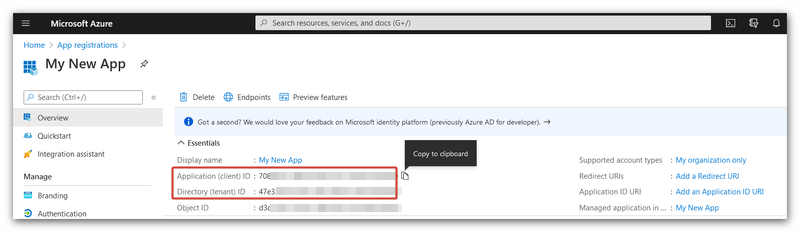
5. Retrieve the IDs required for configuring your third-party product.
- Hover over the relevant ID and click
 to copy it.
- ID of the new Entra ID application: Application (client) ID value
- Tenant ID: Directory (tenant) ID) value
- You can paste it in a text editor for later use.
or - You can go directly to your third-party product and paste it in the relevant ID field.
Step 3: Create and retrieve the client secret of the Entra ID application.
Prerequisite Check that the new Entra ID application is declared as a private client.
- Select Authentication in the left pane.
- Check that the value in Advanced settings > Treat application as a public client is No.
1. Select Certificates & secrets in the left pane and click + New client secret.
The properties window will appear.
2. Specify the information required for creating the client secret.
- Description: Description of the client secret. Note: The default value will be used if you do not specify this field.
- Expires: Select the validity end date for the client secret.
3. Click Add.
- The client secret will be generated.
- Its value will be displayed.

4. Retrieve the client secret required for configuring your third-party product.
- Click to copy the client secret from the Value field in the Client Secrets section.
- You can paste it in a text editor for later use.
or - You can go directly to your third-party product and paste it in the relevant field.
Add permissions authorizing the Entra ID application to use the Microsoft Bookings API
Notes:
- The Microsoft Graph API can be used for a variety of purposes. See List of all permissions available for the Microsoft Graph API.
- The Microsoft Bookings API is the one used for accessing business customer calendar data.
- API delegated permissions are required in order to authorize the Entra ID application to access Microsoft Bookings data.
Step 1: Select the Microsoft Graph API.
1. Select API permissions in the left pane, then click + Add a permission.
The list of APIs whose permission can be requested will appear.

2. Select the Microsoft Graph API.

Step 2: Select the permissions.
1. Select the type of permissions, Delegated permissions, for access with user sign-in (ROPC or Resource Owner Password Credentials mode).

The list of permissions available for the selected API and type of permission will appear.

2. Select the relevant permissions.
3. Click Add permissions.
- The list of permissions authorizing the Entra ID application to use the API by will be refreshed.

- The Microsoft Graph gateway will be activated.
- The access permissions allow Microsoft Bookings data access.
Microsoft Bookings integration using Microsoft Graph
See the Microsoft Bookings integration (via MS Power Automate) using MS Graph.
AccountFreeCreation
How to create a free Azure account
1. Go to the Microsoft Azure website.
2. Click Start free.

3. Log in to your professional Microsoft account.

4. Enter the login information.

5. Click Next.
6. Tick the I agree box.

7. Click Sign up.